


Forms are utilized everywhere in web apps, from creating and editing resources to user authentication. This makes creating forms a recurring task for web developers, react developers included.
Creating forms in react leaves developers with writing boilerplate code for state management, validation and form submission. Libraries like Redux form and Formik solve this problem by abstracting commonly rewritten functionality.
TL;DR
In this article we use Formik, a react library that makes creating and managing forms easy, to create a basic login form.
This article introduces the functionality that Formik provides in the order:
- State management
- Form validation(error messages)
- Form Submission
Requirements
A basic understanding of HTML, react and the Node environment is required to get through this article.
Getting started
We start with creating a react app using the create-react-app package which allows us to bootstrap a react app without having to worry about Webpack and Babel configurations, run the command if you have npm > v5 installed
npx create-react-app quick-form
otherwise, the package can be installed globally using npm and the following command run to create the app
create-react-app quick-form
This creates a folder structure for our app and some sample code, let's edit this. Open the file src/App.js and change the contents to
import React from 'react';
import './App.css';
import 'bootstrap/dist/css/bootstrap.min.css';
import LoginForm from './components/LoginForm'

function App() {
  return (
    <div className="App">
      <LoginForm/>
    </div>
  );
}

export default App;
We import a file in a new folder called components. Create this file, we would write our logic and Formik code there. We also import bootstrap, a css library. We would use this for our styling.
Installing other dependencies
To install other dependencies for the app, we run the command
yarn add formik yup bootstrap
npm can also be used in place of yarn
yup is a validation library that fuses well with Formik. We would use this in place of writing our custom validation.
Enter formik
Now that we have a structure, onto the good stuff. Let's create a simple React component with a markup form in the created components/LoginForm.js file.
import React from 'react';

function LoginForm() {
  return (
      <div className="container mt-5">
      <form>
      <div className="form-group">
      <label htmlFor="email" >
      Email
      </label>
      <input type="email" autoComplete="email" name="email" className="form-control"/>
      </div>
      <div>
      <label htmlFor="password">
      Password
      </label>
      <input type="password" name="password" autoComplete="current-password" className="form-control"/>
      </div>
<button type="submit" className="mt-3 btn btn-primary">Submit</button>
      </form>
      </div>

  );
}

export default LoginForm;
The code above creates a react component that renders a simple HTML form with bootstrap classes for styling.
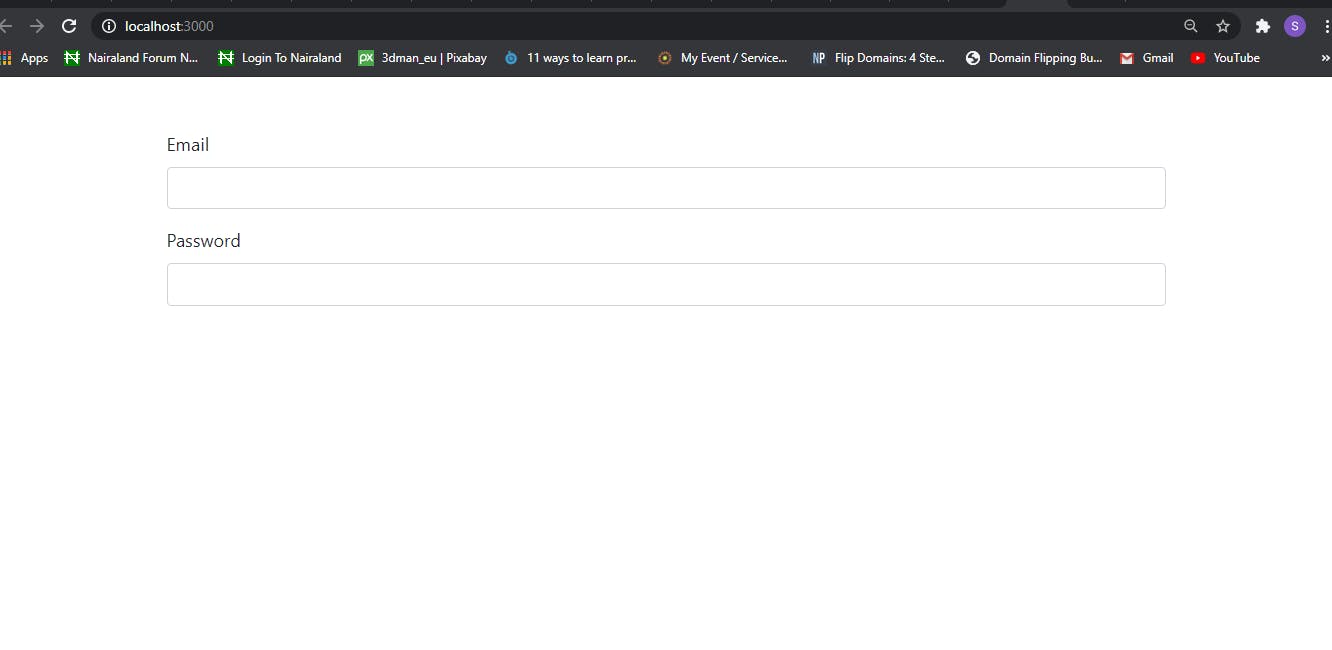
Starting the app by running the command
yarn start
A new tab will be opened in your browser with a view as such:
Formik for form state management
Formik provides an API for setting up your forms with a Formik component that expects a function as a child and a custom hook called useFormik. In this article, we use the custom hook approach. Edit your components/LoginForm.js file to show these changes
import React from 'react';
import {useFormik} from 'formik'

function LoginForm() {
    const formik = useFormik({
        initialValues: {
            email: '',
            password: ''
        },

    })
  return (
      <div className="container mt-5">
      <form>
      <div className="form-group">
      <label htmlFor="email" >
      Email
      </label>
      <input type="email" autoComplete="email" name="email" className="form-control"/>
      </div>
      <div>
      <label htmlFor="password">
      Password
      </label>
      <input type="password" name="password" autoComplete="current-password" className="form-control"/>
      </div>
<button type="submit" className="mt-3 btn btn-primary">Submit</button>
      </form>
      </div>

  );
}

export default LoginForm;
We imported the custom useFormik hook as a named import from the formik package and use the hook in our LoginForm component.
The useFormik hook returns an object we name formik. It takes an object as the first argument, in which we define another object calledinitialValues as an object parameter.
The initialValues object is to have all form inputs' initial values, this could be empty strings. These parameters are used to create the state for the form and all input fields should be represented.
We go on to add the functions from the returned formik object, handleChange, handleBlur and assign the input fields formik state values as the input value.
import React from 'react';
import {useFormik} from 'formik'

function LoginForm() {
    const formik = useFormik({
        initialValues: {
            email: '',
            password: ''
        },

    })
  return (
      <div className="container mt-5">
      <form className="form">
      <div className="form-group">
      <label htmlFor="email" >
      Email
      </label>
      <input
      type="email"
      value={formik.values.email}
      autoComplete="email"
      name="email"
      id="email"
      className="form-control"
      onChange={formik.handleChange}
      onBlur={formik.handleBlur}
      />
      </div>
      <div>
      <label htmlFor="password">
      Password
      </label>
      <input
      type="password"
      id="password"
      name="password"
      autoComplete="current-password"
      className="form-control"
      value={formik.values.password}
      onChange={formik.handleChange}
      onBlur={formik.handleBlur}
      />
      </div>
      <button type="submit" className="mt-3 btn btn-primary">Submit</button>
      </form>
      </div>

  );
}

export default LoginForm;
The handleChange method manages state on change in the input fields and triggers input validation while the handleBlur method is triggered when a field is blurred. The handleBlur method is also used to track touched fields as will be shown.
Note that the id and name attributes are used by formik to identify input fields
Formik for form validation
Validation in formik can be done using a validate function which is also to be a parameter of the object passed to the hook or using a defined validation schema.
Here, we use a validation schema and validation provided by the yup library. Edit the LoginForm component file as follows:
import React from 'react';
import {useFormik} from 'formik';
import * as Yup from 'yup'

function LoginForm() {
    const formik = useFormik({
        initialValues: {
            email: '',
            password: ''
        },
        validationSchema : Yup.object({
            email: Yup.string().email('A valid email address is required').required('Email address is required'),
            password: Yup.string().min(6, 'Password must be at least 6 characters long').required()
        })
    })
  return (
      <div className="container mt-5">
      <form className="form" onSubmit={formik.handleSubmit}>
      <div className="form-group">
      <label htmlFor="email" >
      Email
      </label>
      <input
      type="email"
      id="email"
      autoComplete="email"
      name="email"
      value={formik.values.email}
      className="form-control"
      onChange={formik.handleChange}
      onBlur={formik.handleBlur}
      />
      </div>
      <div>
      <label htmlFor="password">
      Password
      </label>
      <input
      type="password"
      id="password"
      name="password"
      value={formik.values.password}
      autoComplete="current-password"
      className="form-control"
      onChange={formik.handleChange}
      onBlur={formik.handleBlur}
      />
      </div>
      <button type="submit" className="mt-3 btn btn-primary">Submit</button>
      </form>
      </div>

  );
}

export default LoginForm;
We add the handleSubmit method, which also triggers form validation before submit, to the form's onSubmit react attribute.
We import and use yup in the validation schema as seen. yup allows for passing a message(string) argument to its methods, these messages will be displayed as error messages.
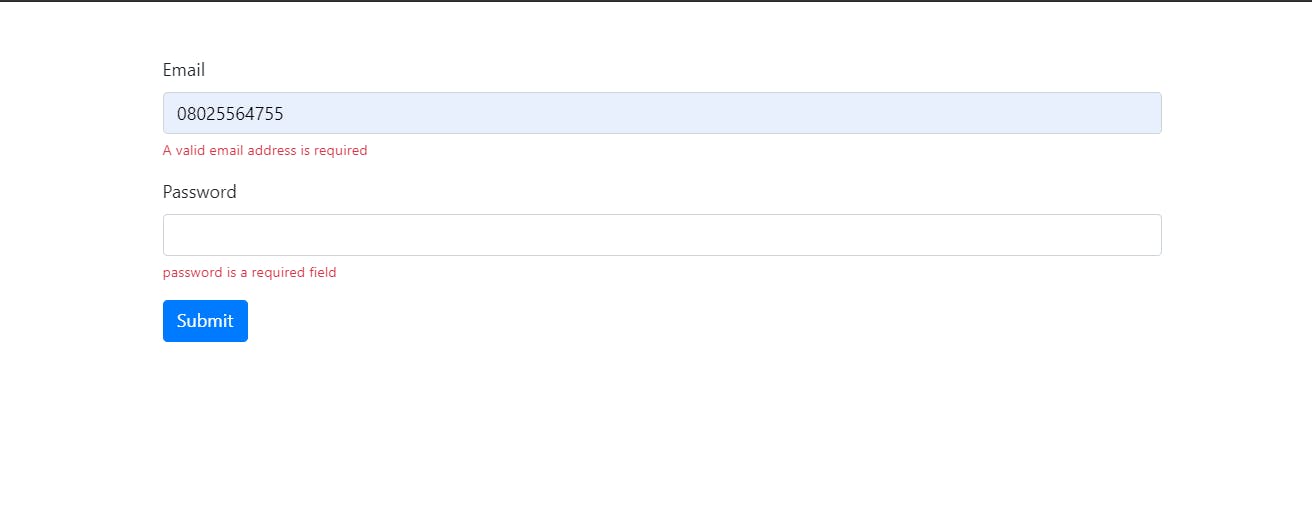
Formik for error messages
During validation, formik appends any error messages from a field to the respective formik.errors attribute. Using this information and the knowledge of which fields have been touched, we can conditionally display error messages.
import React from 'react';
import {useFormik} from 'formik';
import * as Yup from 'yup'

function LoginForm() {
    const formik = useFormik({
        initialValues: {
            email: '',
            password: ''
        },
        validationSchema : Yup.object({
            email: Yup.string().email('A valid email address is required').required('Email address is required'),
            password: Yup.string().min(6, 'Password must be at least 6 characters long').required()
        })
    })
  return (
      <div className="container mt-5">
      <form className="form" onSubmit={formik.handleSubmit}>
      <div className="form-group">
      <label htmlFor="email" >
      Email
      </label>
      <input
      type="email" id="email" autoComplete="email"
      name="email" value={formik.values.email}
      className="form-control" onChange={formik.handleChange} onBlur={formik.handleBlur}
      />
      { formik.touched.email && formik.errors.email ?
        <small className="form-text text-danger">{formik.errors.email}</small> : null}
      </div>
      <div>
      <label htmlFor="password">
      Password
      </label>
      <input
      type="password" id="password" name="password"
      value={formik.values.password} autoComplete="current-password" className="form-control"
      onChange={formik.handleChange} onBlur={formik.handleBlur}
      />
      { formik.touched.password && formik.errors.password ?
        <small className="form-text text-danger">{formik.errors.password}</small> : null}
      </div>
      <button type="submit" className="mt-3 btn btn-primary">Submit</button>
      </form>
      </div>

  );
}

export default LoginForm;
We used jsx to conditionally render the messages with the bootstrap class for the red color. The app view now looks like this with error:
Formik for submitting forms
Another field in the object passed to the useFormik hook is onSubmit which is called after validation is complete and there are no errors. Ajax requests will typically be done here.
Our app is not connected to any backend services so we would only log our form values when this method is called. Let's add the method and log the values passed as arguments
import React from 'react';
import {useFormik} from 'formik';
import * as Yup from 'yup'

function LoginForm() {
    const formik = useFormik({
        initialValues: {
            email: '',
            password: ''
        },
        validationSchema : Yup.object({
            email: Yup.string().email('A valid email address is required').required('Email address is required'),
            password: Yup.string().min(6, 'Password must be at least 6 characters long').required()
        }),
        onSubmit: (values) => {
            console.log('values', values)
        }
    })
  return (
      <div className="container mt-5">
      <form className="form" onSubmit={formik.handleSubmit}>
      <div className="form-group">
      <label htmlFor="email" >
      Email
      </label>
      <input
      type="email" id="email" autoComplete="email"
      name="email" value={formik.values.email}
      className="form-control" onChange={formik.handleChange} onBlur={formik.handleBlur}
      />
      { formik.touched.email && formik.errors.email ?
        <small className="form-text text-danger">{formik.errors.email}</small> : null}
      </div>
      <div>
      <label htmlFor="password">
      Password
      </label>
      <input
      type="password" id="password" name="password"
      value={formik.values.password} autoComplete="current-password" className="form-control"
      onChange={formik.handleChange} onBlur={formik.handleBlur}
      />
      { formik.touched.password && formik.errors.password ?
        <small className="form-text text-danger">{formik.errors.password}</small> : null}
      </div>
      <button type="submit" className="mt-3 btn btn-primary">Submit</button>
      </form>
      </div>

  );
}

export default LoginForm;
This logs our form values once all form fields have passed validation and the onSubmit method is called.
Whew! that's all for our basic form.
To explore further, check out the formik docs.